

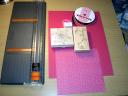
 Beaded Pen Box Tutorial Supplies: paper cutter with scoring and cutting blades.
1 sheet of 8 1/2 x 11 cardstock, 1 sheet of patterned paper
(use the rest of this paper to make a pen to match), choice of ink,
background stamps, grosgrain ribbon, red line tape (not pictured). 
 Cut the cardstock in half lengthwise. (Save other piece to make a matching card that goes with your matching pen.)
 Stamp
two thirds up the paper. The rest of the paper will make your box
top. Do not stamp that if you would like that to be a different
pattern. You may stamp the whole thing if you would like to keep it all
the same.
Stamp
two thirds up the paper. The rest of the paper will make your box
top. Do not stamp that if you would like that to be a different
pattern. You may stamp the whole thing if you would like to keep it all
the same. Now
cut this at 7 inches. With your remaining piece, make a 3×3 square
and stamp a different image on that 3×3 sheet as pictured below.
Now
cut this at 7 inches. With your remaining piece, make a 3×3 square
and stamp a different image on that 3×3 sheet as pictured below. You now have two pieces which will make up your box and box top.
 Now very carefully with the stamped image facing down, score four
lines at exactly one inch apart. You will have a small strip left
over. This is correct. When you fold the box, this will hold the
redline tape or your favorite adhesive which will keep the box closed.
Now very carefully with the stamped image facing down, score four
lines at exactly one inch apart. You will have a small strip left
over. This is correct. When you fold the box, this will hold the
redline tape or your favorite adhesive which will keep the box closed. The next step will be scoring a small bottom section to close of the bottom of the box.
 After you score your other lines turn your paper on the cutter and slide your paper down so the paper overhangs to the right of the cutting line half way or about 1/2 of an inch. Then score all the way up. It will then look like the picture below.
 The small little tab on the leftover piece which you can see at the bottom of this picture can be cut off. It serves no purpose.
 OK…PAY ATTENTION! You may now put the redline tape on the small strip but you must put the tape on the side WHERE YOU HAVE YOUR STAMPED IMAGE, so when you close the box, the tape will be on the correct side.
 Once
you have your box folded and taped, now you can close up and tape up
the ends by folding the flaps over. Your box is now finished. Time for
the lid!
Once
you have your box folded and taped, now you can close up and tape up
the ends by folding the flaps over. Your box is now finished. Time for
the lid! Take
your 3×3 stamped image and turn the stamped side down. Take a straight
edge and a pencil and make an x across the whole sheet diagonally.
This will show your your centerpoint. Lids always make me nervous, so
this is my little way of checking and double checking that it will fit.
At this point I like to put the open box end in the middle and center
it to trace around it just to make sure my scores line up correctly.
You will now score two lines one inch apart on both sides, so you it
will appear to have six little squares.
Take
your 3×3 stamped image and turn the stamped side down. Take a straight
edge and a pencil and make an x across the whole sheet diagonally.
This will show your your centerpoint. Lids always make me nervous, so
this is my little way of checking and double checking that it will fit.
At this point I like to put the open box end in the middle and center
it to trace around it just to make sure my scores line up correctly.
You will now score two lines one inch apart on both sides, so you it
will appear to have six little squares. Double check!!
 Then cut half a triangle out of each corner square closest to the middle square.
 The
put together with adhesive. TRIPLE CHECK that it fits with a little
wiggle room for the extra thin sheet of a paper sleeve we will be adding
inside of this lid. You can always make one side a little looser if it
needs to be.
The
put together with adhesive. TRIPLE CHECK that it fits with a little
wiggle room for the extra thin sheet of a paper sleeve we will be adding
inside of this lid. You can always make one side a little looser if it
needs to be. Time
to make the little sleeve. Cut your printed paper to be a little over
four inches long and about two inches wide. Gently score your paper as
you did your cardstock at 1 inch apart. Fold it like you folded the
box. This sleeve goes inside the lid, so double check the fitting of
the sleeve AS WELL AS THE BOX with the sleeve attached before completely
gluing it in. It should be fine. It is supposed to fit nice and
tightly with not too much wiggle room, or your pen will fall out.
Time
to make the little sleeve. Cut your printed paper to be a little over
four inches long and about two inches wide. Gently score your paper as
you did your cardstock at 1 inch apart. Fold it like you folded the
box. This sleeve goes inside the lid, so double check the fitting of
the sleeve AS WELL AS THE BOX with the sleeve attached before completely
gluing it in. It should be fine. It is supposed to fit nice and
tightly with not too much wiggle room, or your pen will fall out. put rideline tape on your ribbon and add it to the bottom of the cardstock lid.
 ENJOY!
Check out Emily Giovanni’s Blog for the great beaded pen tutorial. I would love to see your work. If you put it up on SCS put Beaded Pen Box in the keywords, so we can find it! You can also e-mail your images to me! My e-mail is oehlers@verizon.net. I would love to post your creations or answer questions if you have them!
No comments:
Post a Comment
Thank You For Stopping In, Please come back soon, I will have many new Card and Ideas as well as Video Tutorials.. I hope you have a wonderful Day!