
Altered matchboxes are easy and fun to make!
These little boxes are approximately the size of standard, store-bought, 32-count matchboxes (1.5″ x 2″ x .5″). They make lovely mini gift boxes, and are also fun to swap! Here you can download the PDF template I created and use for creating these matchboxes from scratch using heavy card stock. (Make sure to download the full-size document using the link below. Do not use the below .gif image.) You can also print the template onto any type of paper and then trace it onto light cardboard, such as cereal box cardboard, to make more sturdy boxes.

Download Rachel’s matchbox template.
Instructions:

Want even more matchbox fun?!
Here is a newer Envelope-style matchbox template:

The inner drawer of this matchbox is exactly the same as my original Matchbox Template above, but the outer wrap differs significantly. The final matchbox constructed with this template will be about the same size as a standard, store-bought, 32-count matchbox – approximately 1.5 x 2 x .5 inches.

Download the Envelope-style Matchbox Template PDF here.
Here are the basic instructions which are also printed on the template:
Also…
Two of your fellow swappers have generously offered to share some free downloadable templates with you. Check ‘em out!

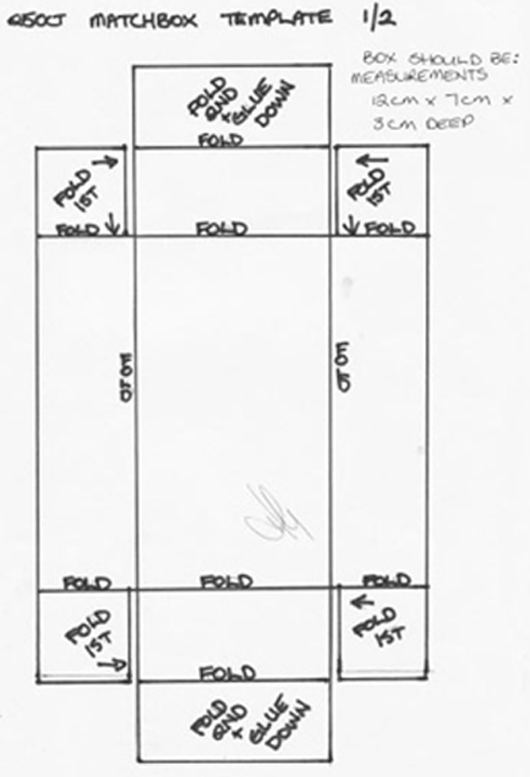
This matchbox template was created by Swap-bot user, HelenJoy. It is for the larger, 250-count matchbox (approximately 4.75 x 2.75 x1.2 inches in size). Click on the image to go to the correct (larger) image size for the template. Then, save it to your computer and print it out – make sure to print it at 100%, not “scale to fit page.” (The template with both parts won’t fit on a single 8.5 x 11 piece of paper so you will either need cut it apart in an image editing program or download the two parts here and here.) The larger matchboxes need to be constructed from something stiffer than card stock, like a cereal box or light cardboard. Let us know if you have any tips or suggestions for constructing them successfully.

Another great download comes from user, IlonaH. She has created an ATC basics kit which is free for download on her personal website. Click here to be taken to “My other life,” Ilona’s blog and the place where you can download her kit. Her kit has an ATC template, plus some digital papers that she has created to get you started making Artist Trading Cards on the computer. A very cool freebie for those interested in trying out some digital crafting!
Thank you, Helen and Ilona, for your nice work and generosity! If there is anyone else out there who would like to share any free templates, patterns, or tutorials, please let me know (email rachel [at] swap-bot.com). I would love to share your projects on the blog.
These little boxes are approximately the size of standard, store-bought, 32-count matchboxes (1.5″ x 2″ x .5″). They make lovely mini gift boxes, and are also fun to swap! Here you can download the PDF template I created and use for creating these matchboxes from scratch using heavy card stock. (Make sure to download the full-size document using the link below. Do not use the below .gif image.) You can also print the template onto any type of paper and then trace it onto light cardboard, such as cereal box cardboard, to make more sturdy boxes.
Download Rachel’s matchbox template.
Instructions:
- Print out template on card stock at 100%. Do not “fit to paper size” in your printer settings or your matchbox will not be the correct size.
- Cut along all black lines; score and fold along all grey lines.
- Apply glue to the light grey areas of the inside drawer.
- Fold the sides of the inside drawer in on themselves (they will be end up being double thick) while tucking the tabs into the folds of the shorter sides of the drawer.
- Fold the outside wrap around the inside drawer and glue it in place.
- Decorate your matchbox!
Want even more matchbox fun?!
Here is a newer Envelope-style matchbox template:
The inner drawer of this matchbox is exactly the same as my original Matchbox Template above, but the outer wrap differs significantly. The final matchbox constructed with this template will be about the same size as a standard, store-bought, 32-count matchbox – approximately 1.5 x 2 x .5 inches.
Download the Envelope-style Matchbox Template PDF here.
Here are the basic instructions which are also printed on the template:
- Print out template on card stock at 100%. Do not “fit to paper size” or your matchbox will not be the correct size.
- Cut along all black lines; score and fold along all grey lines.
- Apply glue to the light grey areas of the inside drawer.
- Fold the sides of the inside drawer in on themselves (they will be end up being double thick) while tucking the tabs into the folds of the shorter sides of the drawer.
- Fold the outside wrap around the inside drawer while folding in its bottom and tucking in the tabs. (I suggest test folding the outer wrap around the inner drawer at first, then removing the inside drawer and doing the final fold with glue. This fold is a little tricky as you must tuck in the tabs and the final side.) Glue it in place.
- The flap on the right side of the outside wrap template is the matchbox’s envelope closure. Fold it over the top of the box and secure it with a seal or ribbon.
- Decorate your matchbox!
Also…
Two of your fellow swappers have generously offered to share some free downloadable templates with you. Check ‘em out!

This matchbox template was created by Swap-bot user, HelenJoy. It is for the larger, 250-count matchbox (approximately 4.75 x 2.75 x1.2 inches in size). Click on the image to go to the correct (larger) image size for the template. Then, save it to your computer and print it out – make sure to print it at 100%, not “scale to fit page.” (The template with both parts won’t fit on a single 8.5 x 11 piece of paper so you will either need cut it apart in an image editing program or download the two parts here and here.) The larger matchboxes need to be constructed from something stiffer than card stock, like a cereal box or light cardboard. Let us know if you have any tips or suggestions for constructing them successfully.
Another great download comes from user, IlonaH. She has created an ATC basics kit which is free for download on her personal website. Click here to be taken to “My other life,” Ilona’s blog and the place where you can download her kit. Her kit has an ATC template, plus some digital papers that she has created to get you started making Artist Trading Cards on the computer. A very cool freebie for those interested in trying out some digital crafting!
Thank you, Helen and Ilona, for your nice work and generosity! If there is anyone else out there who would like to share any free templates, patterns, or tutorials, please let me know (email rachel [at] swap-bot.com). I would love to share your projects on the blog.
No comments:
Post a Comment
Thank You For Stopping In, Please come back soon, I will have many new Card and Ideas as well as Video Tutorials.. I hope you have a wonderful Day!